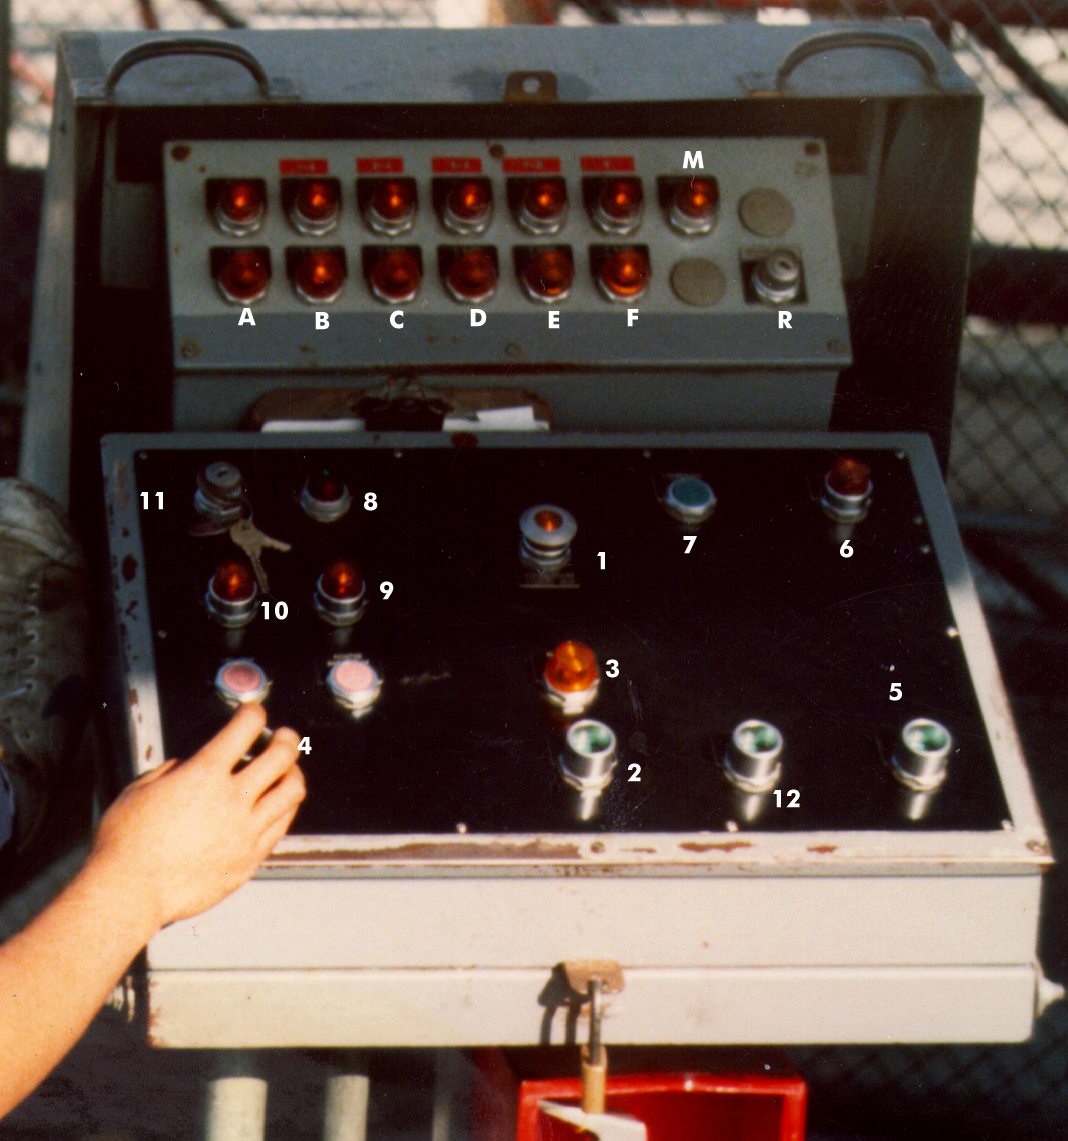
The Jet Star Board
The Jet Star was an easy ride to operate. Just for fun, I've described
how the board's controls operate.
Ever go to an amusment park and ride a roller coaster, look at the
ride operator's control board and wonder what
all those cool looking lights, switches and buttons do? I'm sure today
most of the rides have modern computers that run the ride, but the Jet Star
was 60's technology - all relays!
We always had a rivalry going with the Boardwalk's masterpiece, the
Giant Dipper
. We could brag that we had 6 brake blocks (5 cars on the track at once)
while the "Dipper" could only have two! (we always really knew we couldn't match
up to the "Dipper" though)
The "board" was seperated in to two sections:
- The upper section, which reset the track emergency brakes, and displayed
the status of track "blocks" and brake status. When a block (a section
of track) was occupied by a car, a "block occupied" light lit up. A following
car was not allowed to enter into the occupied block, the ride assured
this by setting a car brake and stopping the following car up on the track.
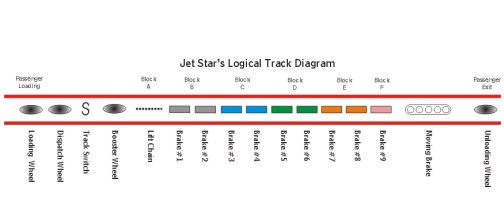
In the picture above, you can see that the ride is operating and blocks "B" and
"F" are occupied.
- The lower section controlled the movement of cars in the station and the
lift chain, it also contained an emergency stop button.
When cars stopped on the track, it was a major event.
Here is a description of each control/indicator:
Lower Board
The lower part of the board was most often used.
- BUTTON 1
The "Mushroom" or emergency stop.
Pressing down on this button would
stop the booster wheel, lift, set all the track brakes and stop the moving brake.
It would be used in an emergency, or when shutting the ride down for the night.
The button was mushroom shaped thus it's name. Pulling up on the mushroom would
allow the brakes to be reset from the upper board and would light the button.
- BUTTON 2
The "Dispatch" button.
Used to "dispatch" a car on the track. After
the board operator looked at the passengers in the car to make sure seatbelts were
fastened, and that there was sufficient space to dispatch a new car, a new car would
be sent.
- BUTTON 3
The "Dispatch Ready" indicator.
A light right above the Dispatch button.
This was actually the first track block. When a car reached the top of the lift, it
ran over a magnetic sensor which cleared the first block and lit the indicator. If this
light was not lit the Dispatch button was locked out and a car could not be sent.
This prevented the board operator from dispatching cars too close together.
- BUTTON 4
The "Dispatch Reset" button.
This button overrode the first track block safety
system. It would light the Dispatch Ready indicator and clear the first block.
It was used to move a car on onto a track switch that connected to a car storage area.
When a car was to be placed out of service (for reductions in ride capacity, malfunctions,
etc.) the board operator could use this button to move a car onto the switch while
a car was on the lift.
- BUTTON 5
The "Loading Wheel #1" button.
Used to move the car from the loading station to the dispatch station. The "loader"
was the person on the crew that stood next to the board operator on the other side of the
board. It was the loader's job to watch for the people to enter
the car at the loading station, and move the
car up to the dispatch station by pushing the Loading Wheel #1 button. Here, the
loader would help the rider fasten seatbelts. The car was then ready for dispatch
by the board operator.
- BUTTON 6
The "Discrepancy Reset" button/indicator.
This was an interesting part of the operation of the board. When the ride's logic
(it was all relays) detected an error, the Discrepancy Reset indicator light
lit up and a loud buzzer sounded. Because the Jet Star was located right on the
Pacific Ocean waterfront, the salt air corroded the electrical connections. This
would sometimes cause track sensor signals to be missed. Sometimes when the buzzer
sounded, the ride would shutdown, other times we would just press the button and
the ride would operate normally. We would always dispatch a mechanic out to check
the Jet Star after a "discrepancy"!
- BUTTON 7
The "Discrepancy Test" button.
Pressing this button for 5 seconds would light the Discrepancy Indicator and sound
the buzzer. This button was always good for scaring cute girls! We would do stupid things like
set off the buzzer and say "Oh my god! the ride is malfunctioning! Don't send a car" and then
send the car. The girls would scream and be scard the ride would fall apart for the whole trip!
- BUTTON 8
The air pressure indicator.
The Jet Star's brakes were operated by air. A large compressor located under the ride
would pressurize a tank that would supply air to the brakes. The red/green indicator would
have to be green before the ride would operate. In the morning, when the ride was opening,
we would flip on the compressor and wait for the tank to pressurize before we could open.
- BUTTON 9
The booster wheel start/stop/indicator buttons.
The amber indicator in the picture means that the booster wheel is spinning. The Jet
Star's cars had a large skid on the bottom. This would be contacted by one of several
tires that would either spin and move the car, or stop the car when the wheel was not moving.
The booster wheel would speed up a slow moving car that was just dispatched by the board
operator. It would be shot up the incline of the lift and two teeth at the bottom of the
car would engage the lift chain for a ride up to the top of the coaster.
Sometimes, if a car was moving extra slow, the booster wheel would slip on the skid of the
car and not give it quite the right boost on to the lift chain. When this happened, the car would
"slam" on to the chain, giving the riders a real jolt. Because the riders sat one in front of the
other (4 in each car) this jolt sometimes would cause the rider's heads to hit together. Nobody
was ever injured when this happened.
- BUTTON 10
The lift start/stop/indicatior buttons.
The amber button indicates that the lift is operating in the above picture. To stop the
lift, the red button was pushed, and to start the lift, the amber button was pushed. The lift
was stopped when the ride was idle (this happened when the ride was open in the winter months
on the weekends when the boardwalk was not crowded).
- BUTTON 11
The power keyswitch.
This enabled power to the ride electronics. It was turned off when the ride closed.
- BUTTON 12
The "Loading Wheel #2" button.
Interestingly, this button did nothing. It looked like at one time a second loading wheel
was planned, but never implemented (or was removed before I came to the ride).
Upper Board
The upper board was mostly used when the ride was being prepared for
operation in the morning, or when cars had stopped on the tracks.
Button/Indicators A-F
The Block Clear buttons and Block Occupied indicators
for blocks A-F.
The Jet Star had a braking system that would not allow the cars on the track
to hit each other. This allowed multiple cars on the track at one time. A car moved up the
lift and down through the ride. As the car moved over the track it rolled over magnetic
sensors that would cause a "block" to be occupied (see the track diagram above). While
the car was on the piece of track defined by this block, if a following car were to run faster
and try to move into the leading car's block, a track brake would automatically stop the
following car. If there were any cars behind the stopped car, they would also be stopped by
the track brakes.
The lower row of lights indicated occupied blocks - cars on the track. The light would move
to the right side of the board as the cars moved down the track, and eventually disappear when the
car moved off of the moving brake.
The top row of lights are buttons/lights that indicated that the brake was "clear" or in the
down position and would let a car pass. If a brake were to raise, the light would go off. In the
picture above, you can see that all the brakes are in the "clear" (released) condition.
These lights are also pushbuttons, and are pushed to lower (release) the brakes manually. This was
done when the ride was opened in the morning, after the "mushroom" was pushed or to release a
stopped car.
BUTTON M
The Moving Brake Start button/indicator.
This pushbutton started the Moving Brake. This looked like a big tank tread and had
many brake pads on it. Cars would come into the station at high speed and the skid on the bottom
of the car would contact the moving brake. The car would then slow to a stop on the moving brake
and the brake would move the car slowly into the station.
BUTTON R
The Reset Brakes keyswitch.
Used to release the brakes manually after the emergency stop button was pressed or
when the braking system had stopped cars on the track. The operator would put a key
in the switch and turn it, then the operator could release the brakes manually by pressing
the "block clear" buttons in reverse sequential order. When the key was turned back to
the normal position, all the brakes would raise and the clear indicators would go out.